The flapper rig is one of the most popular line setups for surf fishing. With a smart design that allows casting multiple hooks at once, this rig offers systematically a higher bite per cast ratio and adds more exciting moments to fishing trips.
I mean, what keeps us we shore anglers hitting the beach and thinking all the time about those sandbars ?
Enjoying the calm beach, setting the tackle, casting the rod, catching fish, kissing them, taking pictures with them… Yes, all that is great and interesting, but what stays longer on our minds are those moments when the line is at tension. In other words, when a fish takes the bait and when you fight a hooked fish and try to drag it to shore.
That’s what rushes adrenaline and dopamine in our bodies and makes us more and more addicted to this sport.
The biggest advantage of the flapper rig is just that. This rig keeps these exciting moments coming and makes rods shake more often, making it one of the most enjoyable line configurations to try from shore.
Having said that, the flapper rig has some disadvantages that make it a poor choice for certain conditions.
That’s what I want to write about in this article.
I want to discuss with you the strengths of the flapper rig and what makes it so common among shore anglers, what are its pitfalls, how to set it up and what does it require in terms of gear and equipment, and also when to use and not to use the flapper rig for surf fishing. So read on 😉
How to tie the flapper rig for surf fishing ?
Even though the flapper rig seems to be complicated and requires a lot of different items to set up, the concept behind it is quite simple and easy to understand.
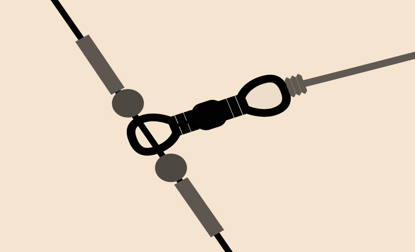
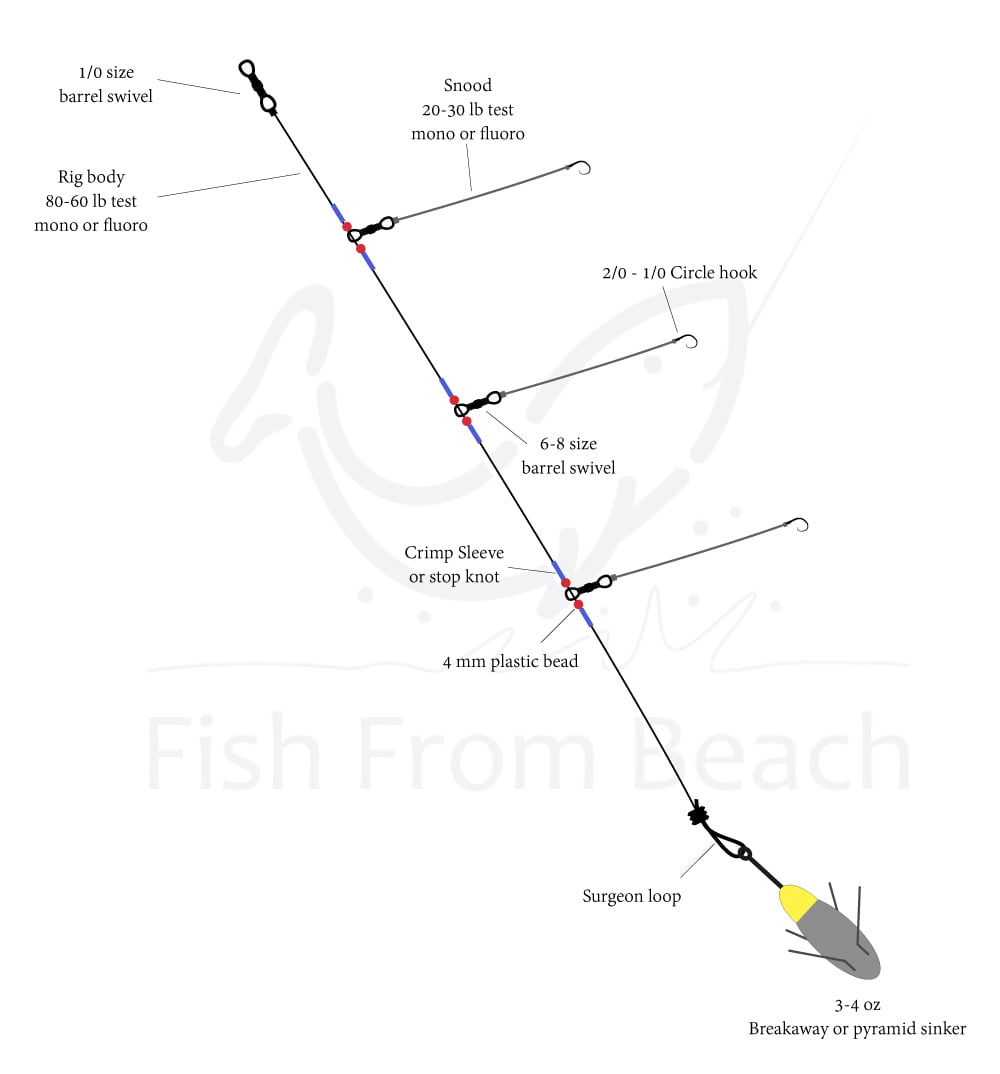
Simply put, the flapper rig is made of a strong line (also called the rig body) connected to the main line via a barrel swivel and on which we connect 1 to 3 hooked snoods and a sinker at the end of it.
Simple no ? now let’s dive into the details.
Let’s start by the rig body. The rig body should be strong because it’s the part of your setup that carries all the weight you cast. In other words, the rig body should serve as a shock leader and be able to cushion the massive pressure you put on the line during the load.
This is extremely critical because if your rig body is weak, your terminal tackle can snap after the cast putting others’ safety at risk.
Therefore, it is very important to make sure your rig body is able to handle your casting weight.
As a rule of thumb, you should use at least 10 pounds of line weight for every ounce of your casting weight. And that includes the sinker and the bait.
For example, if you are casting 5 ounces, then your rig body should be at least 50 lb test. That’s what will keep your terminal tackle connected during the flight.
More about this here.
For my flapper rigs, I use 60-80 lb monofilament rig bodies because mono is stretchy and helps to absorb stress. Also, monofilament is less visible in the water. This gives a great advantage when using the flapper rig as it’s made up of many items and can spook fish when thrown in the water. Using an invisible line will help to improve your presentation and thus make fish more willing to bite.
Fluorocarbon has the same (or better) qualities as monofilament and should also work for the rig body.
The length of the rig body depends on the size of the fish you want to target.
If you are targeting large species, then you need to make sure your rig body is long so you can have enough space between the snoods. On the flip side, if you are targeting small species that feed in schools, then you can use a short rig body because the snoods need to be close to each other.
Generally speaking, the rig body should measure around 1-1.5 meters (3-5 ft). That’s what I’m using and what I see others using.
You should also pay attention to the depth of the surf zone before deciding the length of your rig body. Shallow waters will obviously not allow you to use a long one.
The strength of the snoods depends on the species you are targeting, but as a general rule, 20-30 lb monofilament or fluorocarbon will do well in most situations.
Similarly, the number of snoods to use should be dictated by your objectives and fishing conditions. For small species and open waters, use 2 to 3 snoods. For larger species and abrasive grounds use 1 to 2 hooks maximum.
One thing to stress about is the length of the snoods. No matter the number of snoods you decide to use, make sure they are short enough to not overlap during a cast or when thrown in the water. As a general rule, snoods should measure between 12 and 16 inches.
I prefer mono and fluoro over braid because they are better abrasion resistants and will perform well when fishing sharp structures or when targeting sharp-toothed fish.
In order to connect the snoods to the rig body, you can simply use a T-knot or dropper loop knot. But I prefer to use a barrel swivel between two metal crimps and two 4 mm plastic beads (like in the picture below).
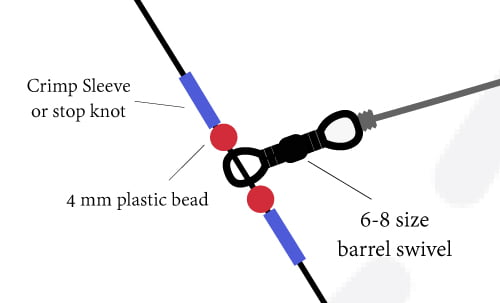
This gives the snood more freedom to float and spin around the rig body without getting tangled.
The metal crimps (or the stop knots) are necessary to fixate the distance between the snoods and prevent them from sliding up or down the rig body, and the beads are there to protect the crimps and increase their durability.
For the hooks, 1/0 – 2/0 circle hooks are most likely all you need. However, it’s a good idea to test other sizes and shapes if you struggle to catch fish. The flapper rig offers you the opportunity to test different things and combinations, so make sure to benefit from that.
At the end of the rig body, use a genie link clip or simply tie a surgeon loop knot and attach a 3-4 ounces pyramid or breakaway sinker. I prefer the breakaway sinker because it holds better at the bottom and has a better ability to get out of snags. Nevertheless, if the surf is calm and the water is not heavily moving, then it’s fine to use less casting weight and egg-shaped sinkers.
What makes the flapper rig great for surf fishing ?
The biggest advantage this rig offers is the opportunity to cover a wider area in the surf zone.
With 2-3 hooks spinning around, the flapper rig makes it possible to deploy baits at different spots in the same moment. This gives you more chances to hook up on something and increase your bite per cast ratio.
Casting multiple baits also releases more scent, oils, and fluids in the water and consequently draw more fish in the direction of your hooks.
In addition, the flapper rig allows you to test different types of bait and see what works best in a particular fishing day. This is extremely beneficial because no bait remains effective all the time. What helped you to catch plenty of fish today can be a total failure the next day. So having a line setup that allows you to test different offerings at the same time will do nothing but give you more bites and an improved hookup rate.
Another big advantage of the flapper rig is that it allows deploying baits at different depths and thus targets both the bottom-feeding species and those who prefer to hold in shallower waters.
What are the limits of the flapper rig ?
Well, the most obvious disadvantage of the flapper rig is the limited casting distance.
With many snoods popping out, this rig receives more friction from the air during the cast which slows it down and makes it fall sooner in the water.
Using fewer hooks and shortening the length of your snoods may help to improve your casting range, but as a general rule, this line setup should not be the way to go if you are aiming for distance.
The flapper rig is also quite difficult to set up and can be overwhelming to novice surf anglers.
As discussed before, The flapper rig relies on some measures and considerations that you should get right if you want to benefit from all the advantages this rig offers. Using the flapper rig when you lack experience can be, therefore, challenging and you may have a difficult time choosing the right items and setting each one as it should.
Another pitfall of the flapper rig is that it can be pretty messy at times. Casting multiple snoods increases the risk of the hooks getting tangled with each other. This can ruin your fishing day and cost you a lot of time trying to get your line right before every load.
Finally, the flapper rig is a poor choice when fishing rough structures.
Casting 2-3 hooks into grounds full of kelp, barnacles, and rocks increases the odds of getting snagged and can result in plenty of expensive tackle left in the surf zone.
Using the 1-hook version of the flapper rig is, therefore, a good idea when fishing mixed seabeds.
When to use the flapper rig for shore fishing ?
With all the advantages and pitfalls we discussed above, it is obvious that the flapper rig is the way to go when targeting small species at a short casting distance from shore.
Pompano, the surfperch, the bream, the whiting, flounder, the puppy drum… are the kind of species we talk about here. These species are generally found around the first sandbar of the surf (typically at 20-40 yards from the shoreline), and thus the casting distance should not be a cause of concern. Moreover, these species usually feed in schools, so throwing multiple hooks may result in multiple catches and should increase your overall productivity.
The flapper rig is also a good choice when trying to catch your own bait before targeting larger predators.
Deploying 2-3 hooks at the first sandbar during the first hour of your fishing trip may give you a bunch of small progies and breams that you can use later to catch sizeable reds or blues.
Also, the flapper rig is a great tool to use when you don’t know which bait to use. Throwing different offerings and analyzing your catches may give you a clear idea of which meal is preferred by fish on your fishing day.
You can then keep using the flapper rig but concentrate more on this bait or use it on another line setup that serves best your fishing objectives and conditions.
Personally, I only use the flapper rig when I have more than one rod (Which I usually do). I tie the 2-hooks version of this rig on one rod, and another rig (Generally the fish finder rig), on the other rods.
Obviously, the rod with the flapper rig is the most alerting and keeps me active all the time. However, I can’t stop using it because it’s the one with most catches, it provides me with a lot of baitfish and helps me tweak the rigs of my other rods.
When to not use the flapper rig for shore fishing ?
As said before, the flapper rig should not be your choice if you want to cast too far. If you are fishing a crowded beach or the first sandbar does not produce great results for you, then the flapper rig won’t help you to do better and reach further spots.
In such a case, it is better to switch to an aerodynamic line setup like the pulley rig to improve your casting range.
Also, the flapper rig can be a poor choice when fishing strong currents.
With multiple snoods and extensions, the water pressure may be able to drag your baited hooks out of the strike zone where interesting things happen.
In such conditions, it is better to use minimalistic rigs so you can reduce the impact of the current and keep your bait where it should be.
Read this article for more tips on fishing strong currents.
In addition, the flapper rig seems to produce the weakest results for me when fishing clear waters. I suspect that throwing too much gear in the surf zone spook fish and makes them less confident to strike. Therefore, the flapper rig should receive more bites in murky and cloudy waters.
And as said before, the flapper rig can be a terrible choice when fishing mixed sea grounds. The higher number of hooks increases the risk of snags when the surf is rich in kelp, weed, and rock piles.
What bait to use with the flapper rig ?
Live and cut bait are both great for the flapper rig.
Live bait adds more action and animation to your hooks as they float around, while using multiple chunks of cut bait maximizes the scent in your targeted area and thus draw more fish to the trap.
For live bait, minnows are always my favorite pick because they are easy to hook and remain active on hooks for a longer period of time. Worms, live squid, and crustaceans are also great options when going live.
For cut bait, use whatever releases fluids and oils in the water. Mullet, menhaden, mackerel, sardines… should all work well and attract fish.
As said before, it is always a good idea to try different baits to see which one is the most effective. This is the opportunity that the flapper rig offers, so make sure to take maximum advantage of it.
What about artificial baits ? will lures work with the flapper rig ?
Well, to be honest, I have never tried lures with the flapper rig, so I can’t tell.
I searched the web to see if other fishermen go artificial with this rig, but unfortunately, I didn’t find plenty. Most anglers use natural baits and very few even talk about lures.
I don’t know why exactly, but it’s probably because lures require more line work and animation, which is not an easy thing to do when many snoods and hooks are attached.
Related : The advantages and disadvantages of natural baits.
Some recommended surf fishing gear(*)
Note (*): If you make a purchase through links from this website, we may get a small share of the sale from Amazon or other similar affiliate programs.
Surf Fishing Survey
Help us provide you with better content by answering simple questions about your surf fishing experience and knowledge.
We will put the collected responses together and turn them into valuable information that will help you catch more fish from shore 😉
Note: No personal information will be collected with your answer.